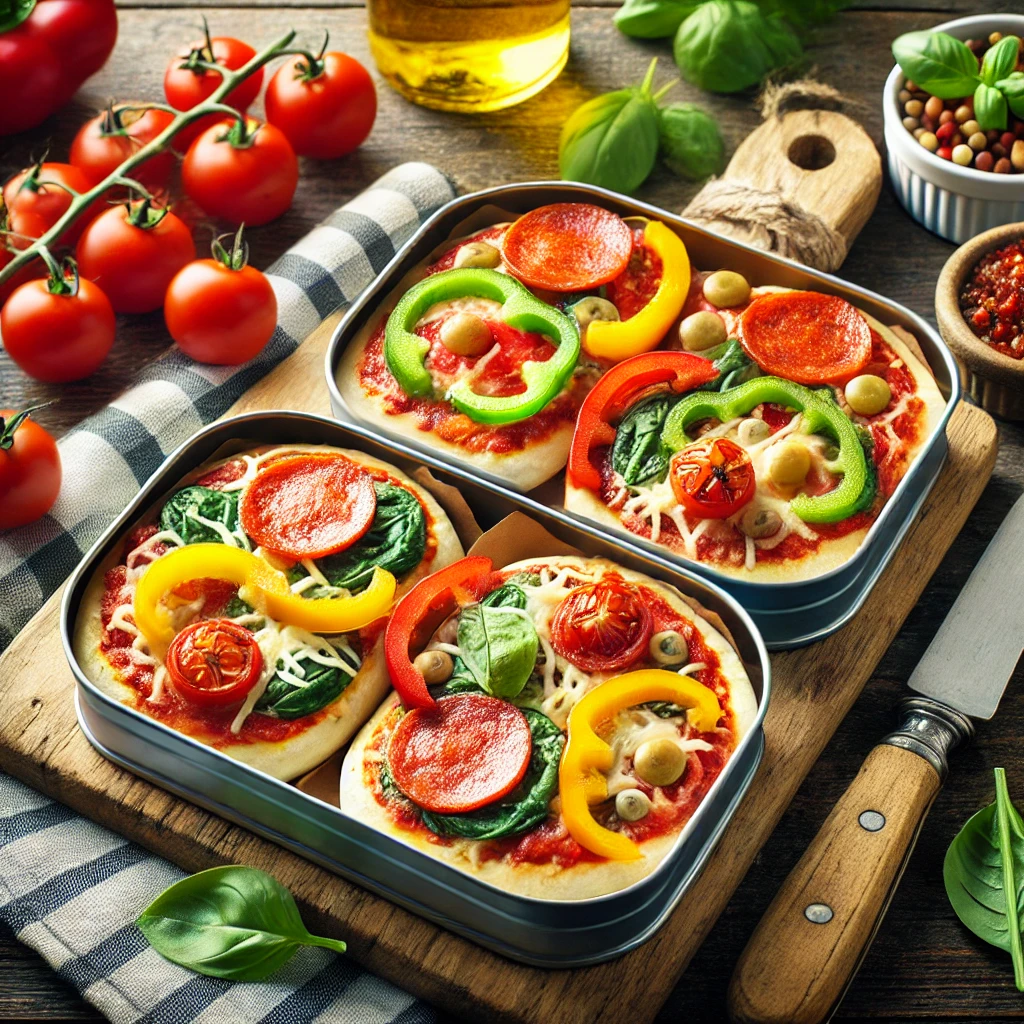
Create delicious and healthy DIY Lunchbox Pizzas with these quick and easy recipes. Perfect for on-the-go meals, these fun pizzas are a great way to add variety to your lunchbox while keeping it nutritious.
Looking for a fun, easy, and healthy lunch idea? DIY Lunchbox Pizzas are the perfect solution. These customizable, mini pizzas are great for kids, busy professionals, or anyone who wants to enjoy a nutritious meal without spending too much time preparing it. With endless options for toppings and bases, they bring variety to your daily routine, while helping you stay on track with healthy eating habits.
In this article, we’ll explore the benefits of DIY lunchbox pizzas, how they promote healthy eating, and creative ways to make them more exciting. You’ll learn why they’re a great choice for meal prep and how to customize them for different tastes and dietary needs.
Why DIY Lunchbox Pizzas Are a Perfect Lunch Option
Tired of the same old lunch routine? DIY Lunchbox Pizzas bring something new and exciting to the table. Here’s why they’re a great addition to your meal plan:
1. Customizable for All Tastes
With DIY lunchbox pizzas, you can cater to any dietary preference. Whether you prefer traditional toppings like pepperoni and cheese or want a healthier option with veggies and lean proteins, the possibilities are endless. You can even adapt them for gluten-free or low-carb diets, making them suitable for anyone.
Kids love making their own pizzas, giving them a sense of control over their meal, while adults appreciate the flexibility to create something delicious and nutritious.
2. Healthier Than Store-Bought Options
When you make DIY Lunchbox Pizzas, you control the ingredients. Choose whole-grain crusts, add plenty of vegetables, and use lean proteins or plant-based alternatives. This way, you can enjoy pizza without the high levels of sodium and unhealthy fats often found in processed or takeout pizzas.
You can even incorporate more nutritious options like cauliflower crusts or use hummus as a base, adding even more nutrients to your meal.
3. Ideal for Meal Prep
One of the best things about DIY lunchbox pizzas is how well they work for meal prep. You can easily prepare multiple pizzas at once, store them in the fridge or freezer, and have a week’s worth of lunches ready. They reheat beautifully, making them a quick and easy option for busy days.
Parents can pack a homemade, nutritious lunch for their kids that’s more exciting than a regular sandwich, while professionals have an easy, portable lunch option that they can bring to the office.
How DIY Lunchbox Pizzas Encourage Healthy Eating
Eating healthy can be a challenge, but DIY lunchbox pizzas make it easier and more fun. Here’s how they help build better eating habits:
1. More Vegetables, Less Fuss
Adding vegetables to pizza is one of the easiest ways to incorporate more greens into your diet. Think spinach, bell peppers, tomatoes, mushrooms, and zucchini—all perfect toppings for your DIY lunchbox pizza. The best part? They taste great, even for picky eaters.
For kids, involving them in the pizza-making process can make them more likely to eat their vegetables. The more fun they have, the more willing they are to try new foods.
2. Controlled Portions
DIY lunchbox pizzas are naturally smaller than traditional pizzas, making portion control easier. You get the satisfaction of eating pizza, but in a more balanced and appropriate size. This is ideal for anyone trying to maintain a balanced diet without overeating.
For kids, the mini-pizza size is perfect for their appetites. For adults, you can easily adjust the portion size to match your nutritional goals, all while enjoying a satisfying meal.
3. Fewer Processed Ingredients
By making your own lunchbox pizzas, you reduce the amount of processed ingredients in your diet. Instead of refined flour, high sodium, and artificial preservatives found in store-bought pizzas, you can use whole foods like whole-grain crusts, fresh veggies, and lean proteins.
This control over ingredients means your pizza is not only tastier but also better for you, providing the energy you need to get through the day without a sugar crash.
Creative Ideas for DIY Lunchbox Pizzas
The real fun with DIY Lunchbox Pizzas comes from the endless customization options. Here are a few creative ideas to keep your pizzas exciting:
1. Try Different Crusts
- Whole-wheat pita: A healthy, fiber-packed alternative.
- Tortilla: For a thin and crispy base.
- Cauliflower crust: Perfect for low-carb eaters.
- English muffins: Great for making mini-pizzas for kids.
2. Experiment with Sauces
- Tomato sauce: A classic.
- Pesto: Adds healthy fats and a burst of flavor.
- Hummus: Creamy and protein-packed.
- Barbecue sauce: Sweet and smoky, perfect with chicken toppings.
3. Explore New Toppings
- Lean proteins: Grilled chicken, turkey, or tofu.
- Vegetables: Spinach, bell peppers, mushrooms, or cherry tomatoes.
- Fruits: Pineapple or figs for a sweet touch.
- Herbs and spices: Basil, oregano, or red pepper flakes for extra flavor.
Packing Tips for DIY Lunchbox Pizzas
To keep your pizza fresh and delicious throughout the day, here are a few tips for packing:
1. Keep Ingredients Separate
Pack the crust, sauce, and toppings separately to prevent sogginess. This allows you to assemble the pizza just before eating, ensuring a fresh taste.
2. Use an Insulated Lunchbox
If you’re packing ingredients that need to stay cool, like cheese or meat, an insulated lunchbox with an ice pack will help keep everything fresh.
3. Add Healthy Sides
Complement your DIY lunchbox pizza with healthy sides like carrot sticks, fresh fruit, or a small salad for a balanced, filling meal.
Conclusion
DIY Lunchbox Pizzas are a fun, healthy, and versatile option for packed lunches. They offer endless possibilities for customization, are easy to prepare ahead of time, and can be tailored to fit any dietary preference. Whether you’re making them for kids or for yourself, these mini pizzas add variety to your lunch routine while promoting healthier eating habits.
With DIY lunchbox pizzas, you can enjoy the convenience and satisfaction of pizza without compromising on nutrition. So, why not try them out and make your lunchtime more exciting and nutritious?

DIY Lunchbox Pizzas
Equipment
- Baking sheet
- Parchment paper
- Spoon for spreading sauce
- Small knife for cutting toppings
Ingredients
- 4 whole wheat pitas (or English muffins, tortillas, or cauliflower crusts)
- 1 cup pizza sauce (or tomato sauce)
- 1 1/2 cups shredded mozzarella cheese (or dairy-free alternative)
- 1/2 cup sliced pepperoni (or turkey, chicken, or plant-based alternative)
- 1 cup sliced vegetables (bell peppers, mushrooms, spinach, etc.)
- Olive oil for brushing the base
Instructions
- Preheat the oven: Preheat your oven to 400°F (200°C). Line a baking sheet with parchment paper to prevent sticking.
- Prepare the pizza bases: Place the whole wheat pitas (or your choice of base: English muffins, tortillas, or cauliflower crusts) on the prepared baking sheet. Lightly brush each base with olive oil to help them get crispy in the oven.
- Spread the sauce: Using a spoon, spread about 2-3 tablespoons of pizza sauce onto each base. Be sure to leave a small border around the edges for the "crust."
- Add the cheese:Sprinkle shredded mozzarella cheese (or your choice of dairy-free alternative) evenly over the sauce on each pizza.
- Customize with toppings: Add your favorite toppings! Layer sliced pepperoni, vegetables, or any other desired toppings. Be creative—add as much or as little as you like.
- Bake the pizzas:Place the baking sheet in the oven and bake for 8-10 minutes, or until the cheese is melted and bubbly, and the crust is golden and crispy.
- Let the pizzas cool: Once the pizzas are done baking, remove them from the oven and let them cool for a few minutes before slicing or packing them in lunchboxes.
- Store or serve:Enjoy the pizzas immediately, or pack them in an airtight container for later. They can be stored in the refrigerator for up to 3 days. For longer storage, wrap them tightly and freeze them for up to 2 months.
Notes
- You can prep these pizzas in advance and store them in the fridge for up to 3 days or freeze them for later use.
- Get creative with the toppings! Try using fresh herbs, grilled chicken, or even fruit like pineapple for variety.
- For a gluten-free option, use a gluten-free pizza base like cauliflower crust or gluten-free tortillas.


1 Comment